Showing posts with label Doll-making. Show all posts

Monday, September 8, 2008

SWANS using CANs


I learnt this, during one of the "Green and Clean Week", an event organised at Singapore.

Swans using CANs. Very simple one ....

- Cut the top portion and discard.
- Cut the body into thin strips, till the bottom.
- Carefully roll into desired shapes as shown in the picture
- Tin won't cut since they are too thin and flexible. However, guide your kids if they are doing it.

I am submitting this to the CAN Art Event


Waiting for your entries :)

Friday, July 25, 2008

New Dolls and an Award!

Okay Friends, back with my new creations, but before that....


My Dear Jose has given me "Blogging Forever Friend" award.

She is from England and very creative :). DO visit her blog!

Thank you so much Jose :), I feel honoured!!!


The following rules apply to this award:

1. Only 5 people are allowed to receive this award
2. 4 of them followers of your blog.
3. One has to be new to your blog and live in another part of the world.
4. You must link back to who ever gave you the award.


I choose four of my "frequent" (I highlighted this, since I have many ;)) followers to this blog :

Priyanka
Sowmya
EC
Jil Jil

and

Purva Desai, who was from London and new to my blog.

Congrats Friends!!!


And now to my new creations.....


And Flower Making Event has been extended till July 31st.

Please create your flowers, post to your blog and let me know. I will pick up the flowers from your blog. If you do not have a blog, please email me your 'Flower' pictures to illatharasi at gmail dot com.


Meet you all next week!!!

Happy weekend!!!

Wednesday, July 9, 2008

Corrugated Doll Making (Quilling) - Part III

Much awaited Corrugated Paper Dolls Rally...... :-)


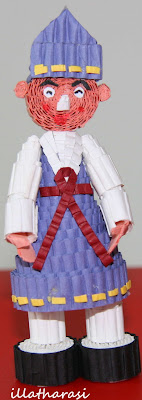
Few couples.......


Below two were designed by my friend Jil Jil


Now, for next week's attraction......... We need plain colour papers for these... so collect different colours and keep them ready;)


See you all soon....... :)

Wednesday, July 2, 2008

Corrugated Doll Making (Quilling) - Part II

Today, let us see how to make hands and body:)


For Body/Dress:
- For Body/Dress, we need to use 2 0r 3 strips of paper, depending on the size of the doll.
- Stick one end of the strip with anther. Roll it, having the flat side inside, as you did for face.
- Glue it at the end and finish the circle.
- Put the circle in between the plastic clips for 10 minutes, so that it will get hold properly.
- Gently push from centre of the circle, so that it forms a cone. Do it slowly so that it wont come off. Check the above picture.
- Apply glue inside the cone, so that it fixes firmly.
- Allow it to dry completely.

Note:
I use 3 strips for girl doll and 2 strips for a boy and attach, legs and shoes as shown in the below pictures.


For hands/Sleeve:
- For hands/sleeve, roll the strip, having the flat side inside, as you did for face.
- Glue it at the end and finish the circle.
- Put the circle in between the plastic clips for 10 minutes, so that it will get hold properly.
- Gently push from centre of the circle, so that it forms a cone. Do it slowly so that it wont come off.
- Similarly do one more. Glue inside the cone, so that it fixes firmly.
- Allow it to dry completely.
- Once they are completely dry, join them as shown in the pictures above.

There are few other types of hands too, see patterns below. Design on your own imagination:)


For Legs & Shoes:
- Choose the colour matching to the dress and take 1 strip. Use 1/2 of it for each foot.
- Roll it as a oval and glue it at the end. Two colours can also be used.
- For the legs, you can cut one strip into 4, and use 2 strips for 1 leg. Roll them as circles and paste one above another. Check the pictures below for patterns.


For Eyes, Lips, Fingers:
- For fingers, use a small bit of strip, fold it into 3 and attach at the end of the sleeve. Use the same colour as the face. See above picture.

- Start making eyes, lips either using sketch pens or you can cut small strips of paper and attach them. Or use beads or bindies for the eyes. Check the below pictures.


- You can attach plaits for a girl doll. Take small piece of strip and cut into 3 pieces lengthwise, don't cut it completely, allow 1cm of strip at the end, so that you can attach it to the head. See the pictures below.


- Decorate dress and sleeves with beads, shiny glue, paper strips, ribbons, etc.
- Allow each part to dry completely and join together.


Let's see the finished dolls next week ..... ;)

HAPPY WEEKEND!!!!

Monday, June 30, 2008

Corrugated Doll Making (Quilling) - Part I

Quilling is an art of rolling strips of paper into different shapes and forming designs. It is also known as Paper Filigree. I am not sure of its origin, but I got to know about it, 3 years back, when my brother-in-law sent me these strips of paper from South Korea.

Corrugated paper strips are good for making dolls. Ordinary paper strips can be used for making greeting cards, decoration, etc, which I will be discussing after doll-making. It is fun and easy making these dolls. Click-start your imagination to make these cute dolls........


Tools Needed:
Corrugated Paper strips - different colours (each of 1cm width and 50cm length)
Glue or Adhesive (Use Fevicol adhesive, so it will be long lasting)
Toothpicks
Plastic clips (use those we use for drying clothes)
Glitter Gum - different colours
Decorating stones (stones, bindies, etc - use your own choice)
Scissors
Tweezers (optional)
A piece of cloth (to remove excess glue if any)
Sketch pens


Method:
For Face:


- Take light colour paper strips for face.
- Roll the strip, having the flat side inside. If you are not able to start, roll it on a toothpick and then remove it and tighten. Make sure it is not loosen or too tight.
- Glue it at the end and finish the circle.
- You can put the circle in between the plastic clips for 10 minutes, so that it will get hold properly. Head is ready as above.


For Ears and Nose:


- Cut small strip of paper, length of 1cm and width of 0.5cm.
- Roll it and make 2 small circles. Glue it at the end and finish the circle. Press a little, to make them flat. These will be ears.
- With the same measurement, make one more circle, glue it, and press it one end, so that it gets a triangle shape. This will be nose.
- Check the images above and glue it to the face at the correct postions.


So keep face, nose, ears ready. We will see body and hands in couple of days ;)

Thursday, June 26, 2008

Next week's attraction.....


Next week's attraction.....

Corrugated Papers - Doll making

....... keep watching for the updates........