Showing posts with label Quilling. Show all posts

Thursday, August 28, 2008

Flowers from JODY!

My new friend, Jody shared her beautiful quilled flowers. She use these flowers to make beautiful cards and decorate gift boxes.

See her creations below:


I loved her Rose flowers and she did sent me the tutorial document too. Would be sharing my roses with you all next month ;) Meanwhile, if you need the tutorial do email me @ illatharasi at gmail dot com.

She also told me about Quilling group in Yahoo, I joined them. If you are interested in Quilling, please join the group.

---------------------------------------

3 more days to go for the Rakhi Event. Do send me your creations if you have!

Watch out for the roundup and next month's event, on September 1st :)

Have a nice weekend!

Saturday, August 2, 2008

Flower Making - July 2008 - Round-up!!!


This was my first event in this blog and happy to get these lovely flowers .....

1) EC's CUTE LITTLE FLOWERS!!!!


2) Sowmi's BIG FLOWERS;) - I love the title, Thanks Sowmi!!!


3) Jil Jil's COLOURFUL FLOWERS!!!


4) My Contribution;)


Watch out this space for Priyanka's http://notyet100hub.blogspot.com/ ......


I guess, deadline was too short last month ... so from this month, we will take one whole month;) So next month, we will have more participants!!!!

Hmmm..... This month's event would be posted on Monday.... so keep watching... see you all in 2 days ;)

Happy weekend!!!

Friday, July 25, 2008

New Dolls and an Award!

Okay Friends, back with my new creations, but before that....


My Dear Jose has given me "Blogging Forever Friend" award.

She is from England and very creative :). DO visit her blog!

Thank you so much Jose :), I feel honoured!!!


The following rules apply to this award:

1. Only 5 people are allowed to receive this award
2. 4 of them followers of your blog.
3. One has to be new to your blog and live in another part of the world.
4. You must link back to who ever gave you the award.


I choose four of my "frequent" (I highlighted this, since I have many ;)) followers to this blog :

Priyanka
Sowmya
EC
Jil Jil

and

Purva Desai, who was from London and new to my blog.

Congrats Friends!!!


And now to my new creations.....


And Flower Making Event has been extended till July 31st.

Please create your flowers, post to your blog and let me know. I will pick up the flowers from your blog. If you do not have a blog, please email me your 'Flower' pictures to illatharasi at gmail dot com.


Meet you all next week!!!

Happy weekend!!!

Thursday, July 24, 2008

Flower Making ...... Date Extended....:)

Dear All!!!!


Upon request from few of them, I am extending the date of "Flowers submission"

http://creationsss.blogspot.com/2008/07/flower-making-quilling-part-i.html

till July 31st.


Check out these new designs too and GEAR up and start sending ;)


Wait for few new creations .... tomorrow;)

Friday, July 18, 2008

Flower Making (Quilling) - Part I


Sorry guys for the delay .... held up with lots of work and unable to spend time for this blog :(

Okay moving on to flower making......

I am bit lazy today, to key-in ..... so I have just posted the pictures for each process.... and described in few words... If you have any questions/doubt, please feel free to ask me ...


Materials Needed :


Glue, Toothpicks, small sharp scissors, strips of colour papers (I used 15 cm length and 1cm width)


Method:

Step 1:
Use 2 colour papers. Cut one strip into 2 halves. Again cut one half into two lengthwise.


Step 2:
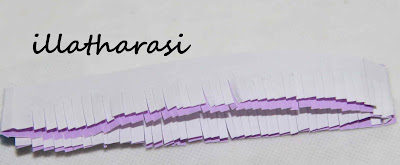
Use the other colour strip. Fold into 4, and start cutting them carefully so that it looks like a fringe.


Step 3:
Glue the fringed paper and the half-cut paper.


Step 4:
With the help of the toothpick, slowly roll them. Toothpick should neither be tight nor loose, it should come out of it easily.


Step 5:
Roll completely and glue it at the end.


Step 6:
Remove the toothpick, and carefully press the cut strip, so that it becomes a beautiful flower.


These are very simple flowers..... so flow your creativity, make your flowers, take a picture, publish it in your blog, and email it to me at illatharasi @ gmail dot com, by next wednesday (July 23rd).

We will display all our flowers here :)

Mine is displayed below:


Next week, we will see a different design....... Keep checking!

Wednesday, July 9, 2008

Corrugated Doll Making (Quilling) - Part III

Much awaited Corrugated Paper Dolls Rally...... :-)


Few couples.......


Below two were designed by my friend Jil Jil


Now, for next week's attraction......... We need plain colour papers for these... so collect different colours and keep them ready;)


See you all soon....... :)

Wednesday, July 2, 2008

Corrugated Doll Making (Quilling) - Part II

Today, let us see how to make hands and body:)


For Body/Dress:
- For Body/Dress, we need to use 2 0r 3 strips of paper, depending on the size of the doll.
- Stick one end of the strip with anther. Roll it, having the flat side inside, as you did for face.
- Glue it at the end and finish the circle.
- Put the circle in between the plastic clips for 10 minutes, so that it will get hold properly.
- Gently push from centre of the circle, so that it forms a cone. Do it slowly so that it wont come off. Check the above picture.
- Apply glue inside the cone, so that it fixes firmly.
- Allow it to dry completely.

Note:
I use 3 strips for girl doll and 2 strips for a boy and attach, legs and shoes as shown in the below pictures.


For hands/Sleeve:
- For hands/sleeve, roll the strip, having the flat side inside, as you did for face.
- Glue it at the end and finish the circle.
- Put the circle in between the plastic clips for 10 minutes, so that it will get hold properly.
- Gently push from centre of the circle, so that it forms a cone. Do it slowly so that it wont come off.
- Similarly do one more. Glue inside the cone, so that it fixes firmly.
- Allow it to dry completely.
- Once they are completely dry, join them as shown in the pictures above.

There are few other types of hands too, see patterns below. Design on your own imagination:)


For Legs & Shoes:
- Choose the colour matching to the dress and take 1 strip. Use 1/2 of it for each foot.
- Roll it as a oval and glue it at the end. Two colours can also be used.
- For the legs, you can cut one strip into 4, and use 2 strips for 1 leg. Roll them as circles and paste one above another. Check the pictures below for patterns.


For Eyes, Lips, Fingers:
- For fingers, use a small bit of strip, fold it into 3 and attach at the end of the sleeve. Use the same colour as the face. See above picture.

- Start making eyes, lips either using sketch pens or you can cut small strips of paper and attach them. Or use beads or bindies for the eyes. Check the below pictures.


- You can attach plaits for a girl doll. Take small piece of strip and cut into 3 pieces lengthwise, don't cut it completely, allow 1cm of strip at the end, so that you can attach it to the head. See the pictures below.


- Decorate dress and sleeves with beads, shiny glue, paper strips, ribbons, etc.
- Allow each part to dry completely and join together.


Let's see the finished dolls next week ..... ;)

HAPPY WEEKEND!!!!